
Showing posts with label SharePoint 2013. Show all posts
Showing posts with label SharePoint 2013. Show all posts
Thursday, December 22, 2016
Monday, October 17, 2016
Move SharePoint 2013 Search Index Location to a other location
When we setup SharePoint Search Service Application using Central Administration, there is no place to set INDEX LOCATION.

we can current topology using Central Administration. Here we should have all the components in GREEN status.

7) SET new one as ACTIVE
Set-SPEnterpriseSearchTopology -Identity $Clone
If we Type,
Get-SPEnterpriseSearchTopology -Active -SearchApplication $ssa
It will return 7 components including 2 INDEX COMPONENTS

================================================================
8) Then Gets the Search Topology again,
$SSA = Get-SPEnterpriseSearchServiceApplication
$Current = Get-SPEnterpriseSearchTopology -SearchApplication $SSA -Active
9) Creates a copy of the current Search Topolog again,
$Clone=New-SPEnterpriseSearchTopology -Clone -SearchApplication $SSA -SearchTopology $Current
10) Removes the old Index Component from the Search Topology, THIS IS THE MOST CRITICAL
Get-SPEnterpriseSearchComponent -SearchTopology $Clone | ? {($_.GetType().Name -eq "IndexComponent") -and ($_.ServerName -eq $($Instance.Server.Address)) -and ($_.RootDirectory -ne $IndexLocation)} | Remove-SPEnterpriseSearchComponent -SearchTopology $Clone -Confirm:$false
11) Sets our new Search Topology as Active
Set-SPEnterpriseSearchTopology -Identity $Clone
With the usage of CRAWLING, the location will be filled with INDEXED files.

If we want to change the location of INDEX folder, we have only 1 options. That is using POWERSHELL.
1) We have to create a new INDEX LOCATION
$IndexLocation = "H:\New_SearchIndex"
New-Item –ItemType Directory –Path $IndexLocation
2) Then we have to get current Search Service Application to a variable
$SearchServiceName = "SearchSer"
$SSA = Get-SPServiceApplication -Name $SearchServiceName;
3) Then we get the current Search Service Instance to a variable
$Server = "SPDEV1APP"
$Instance = Get-SPEnterpriseSearchServiceInstance -Identity $Server;
4) Then we have to get current serach topology
$Current = Get-SPEnterpriseSearchTopology -SearchApplication $SSA -Active;
we can current topology using Central Administration. Here we should have all the components in GREEN status.

5) Create a CLONE of current Search Topology
$Clone = New-SPEnterpriseSearchTopology -Clone -SearchApplication $SSA -SearchTopology $Current
6) Now we SET new INDEX LOCATION
New-SPEnterpriseSearchIndexComponent -SearchTopology $Clone -IndexPartition 0 -SearchServiceInstance $Instance -RootDirectory $IndexLocation
7) SET new one as ACTIVE
Set-SPEnterpriseSearchTopology -Identity $Clone
If we Type,
Get-SPEnterpriseSearchTopology -Active -SearchApplication $ssa
It will return 7 components including 2 INDEX COMPONENTS

================================================================
8) Then Gets the Search Topology again,
$SSA = Get-SPEnterpriseSearchServiceApplication
$Current = Get-SPEnterpriseSearchTopology -SearchApplication $SSA -Active
9) Creates a copy of the current Search Topolog again,
$Clone=New-SPEnterpriseSearchTopology -Clone -SearchApplication $SSA -SearchTopology $Current
10) Removes the old Index Component from the Search Topology, THIS IS THE MOST CRITICAL
Get-SPEnterpriseSearchComponent -SearchTopology $Clone | ? {($_.GetType().Name -eq "IndexComponent") -and ($_.ServerName -eq $($Instance.Server.Address)) -and ($_.RootDirectory -ne $IndexLocation)} | Remove-SPEnterpriseSearchComponent -SearchTopology $Clone -Confirm:$false
11) Sets our new Search Topology as Active
Set-SPEnterpriseSearchTopology -Identity $Clone
If we Type again,
Get-SPEnterpriseSearchTopology -Active -SearchApplication $ssa
It will return only 6 components including only 1 INDEX COMPONENT

It is set to new INDEX LOCATION. Now Do a CRAWL using Central Administration.
Get-SPEnterpriseSearchTopology -Active -SearchApplication $ssa
It will return only 6 components including only 1 INDEX COMPONENT

It is set to new INDEX LOCATION. Now Do a CRAWL using Central Administration.
Friday, August 5, 2016
How to Solve the issue of "SharePoint Search Service is Stopped"
SharePoint Search is a critical Service, which needs to up and running for many things. If the Search is in PAUSED status, then we can't do a crawl.

First We have to verify All the necessary SERVICES are up and running.
Then we have to make sure the account has permission to run a CRAWL.
Also we have to verify the Alternative Access Mapping is set.
If we cant resolve the issue, then have a look of EVENT VIEWER.

There we can see the "Content Plugin can not be initialized" error message. It makes little interesting and I had a look of SEARCH TOPOLOGY.

Then it shows as "Unable to Retrieve Topology Component". Then we can assume PERMISSION issue somewhere.
Then I have found that the Service called "Windows Service - Search Host Controller Service".

That Account is responsible of working with NODE RUNNER and setting up the SharePoint farm topology. So that account needs LOCAL ADMIN privileges. After I have set the PERMISSION for the account,

The Topology Starts working and fine. It displayed all the COMPONENTS correctly with GREEN color.
Then I was able to see CRAWLING options in front of CONTENT SOURCES.

It makes all other related issues sorted and works fine.
Wednesday, August 3, 2016
Workflow Initiation is Failing on SharePoint Farm and Solution
My SharePoint farm was integrated with Workflow Service and worked fine till a restart.


All of sudden it failed to start new workflows. Then I tried to start a WF manually.

Still It failed.
Then I have opened the "Workflow Manager Powershell" and tried to get the current status of the WF farm. (get-WFfarmStatus)

Surprisingly, the WorkflowServiceFrontEnd service was stopped.
With commands we cant start the WorkflowServiceFrontEnd.
First we have to STOP Backend service using,
net stop WorkflowServiceBackend

Then We have to START the Backend Service using,
net start WorkflowServiceBackend

Now we can check the STATUS again,

Both Services are RUNNING smoothly.
Now we can start Workflows.
Monday, June 27, 2016
Configuration of Multi-Lingual SharePoint Sites
When we need to display our
SharePoint portal with different languages we can enable site variations, that
is an in-built feature comes with SharePoint. For that first we need to
identify necessary languages for the proposed SharePoint site. In this case I
will configure Arabic language along with English.
First we need to download Arabic
Language Pack for SharePoint.

Then we have to install language pack
for application servers + web front end servers.

We can verify whether the relevant
LANGUAGE PACKS are installed via central administration.
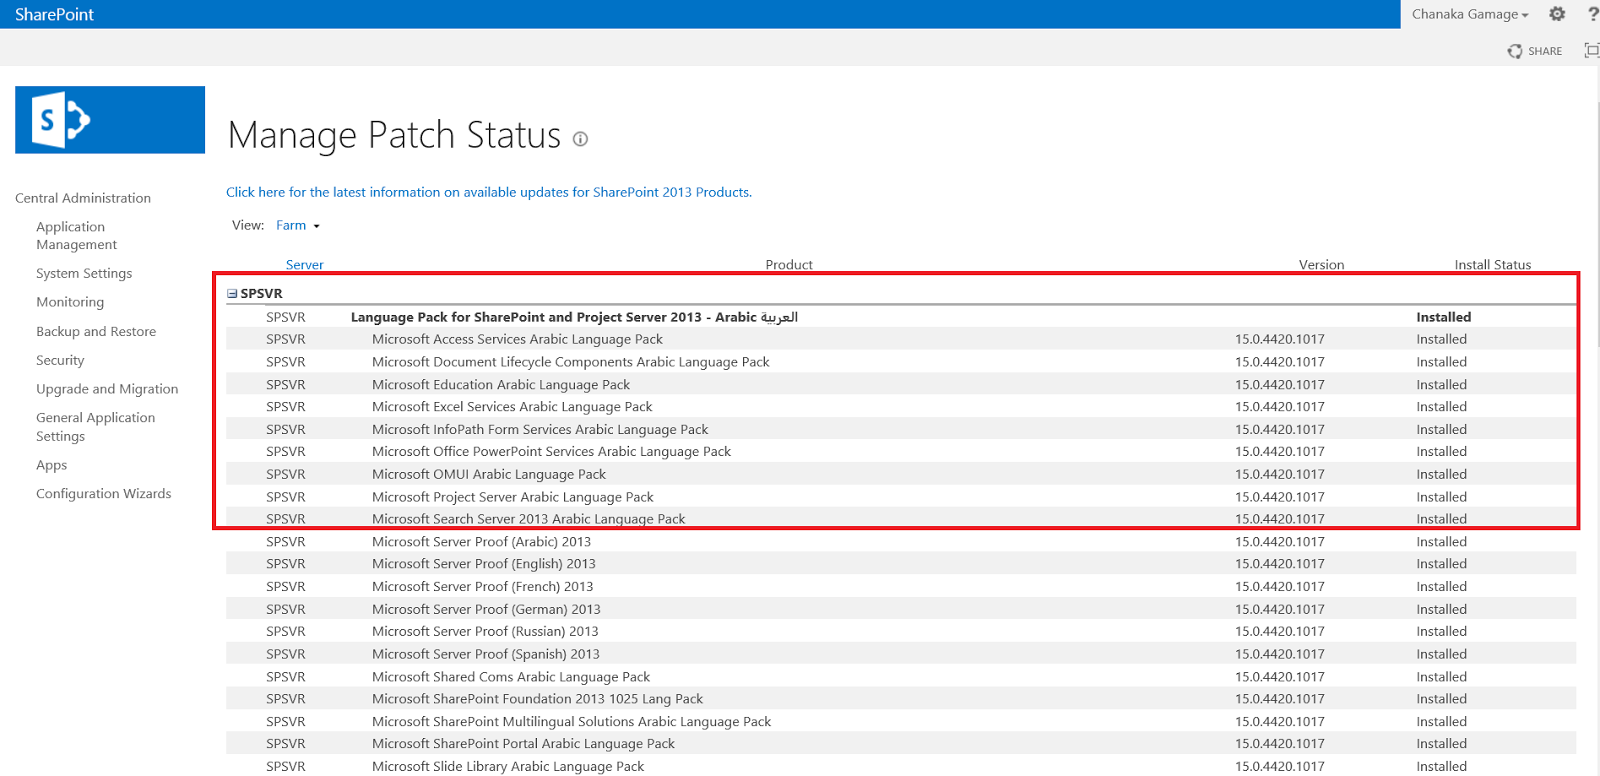
In central administration àManage Patch Status
under “Upgrade and Migration” section
Then we have to go to relevant site
collection and,
Site
Settings àVariation
Labels

There we can see current labels (in
this case, English) and I’m going to create new label for Arabic.

We will go through a 5 step wizard
and it starts by picking the necessary language. We will get a drop down with
the available languages. Then we have to pick a LOCALE also for the required
Language.
Then we have to assign a NAME to
LABEL. It will append to the URL (here http://spsvr:ar-sa)

There we have to specify “Display
Name” and “Hierarchy Creation”. We can choose,
·
Publishing sites, List and pages OR
·
Publishing pages OR
·
Root site only
In step 3, we have to specify how
we can set whether users to translate the whole SharePoint site. Machine
translation is also possible if “Machine Translation Service” is running on
servers.

We can check it via Central
Administration à
Services on Server

Then we have to go the step 4, that
is the CONTENT changing mechanism and Page Update behavior. There we can set
either,
1) User can
manually sync update
2) Automatically
update sites using SharePoint timer jobs

After all, steps we can verify all
the settings in the Steps 5. Then Finish the wizard.

We can see our latest Site
variations in the
Site settings à Variation Labels as “ar-sa”

When we go to Site settings à Variation Logs, we can
see important messages. That is about SharePoint timer jobs.

So it is better to go and check newly created
SharePoint timer jobs,
It is called “Variations Create Hierarchies Job definition” and it will do the
content translation.

We have to wait our SharePoint
timer jobs do the backend work.
That will create of new SITES for
new Multi-linguals. In this scenario we can see newly create Sub-Site called
“Arabic (Saudi Arabia)” under root site collection.

When we go to the site we can Pages
are created and waiting for PUBLISH.

After that we have to Approve Page
to view normal users.

Then we can navigate to language
SITE that we want.

We can click the RIBBON and check
the content.

We can also take necessary actions
within the site with ARABIC language.

It is a cool feature that comes
with SharePoint to enable MULTI-LINGUAL sites.
Sunday, June 12, 2016
OVERVIEW OF SHAREPOINT SEARCH
SharePoint is implemented and
developed for the content management. With the loads of content including
documents, images and videos the SharePoint bare a lot of data. Then it is
essential to find the data in speed manner with usability. For that SharePoint
introduces SEARCH itself. On the other hand Microsoft invested a lot of money
to build their own search engine, so called FAST Search. Until SharePoint 2010,
the search mechanism was purely based within SharePoint and had limitations.
With the implementation of SharePoint 2013, the FAST search also integrated and
bundled FREE with SharePoint.
SharePoint Search is introduced with
a lot of usable features for content users. The Search is categorized as,
1)
Everything
2)
People
3)
Conversions
4)
Videos

With the introduction of PEOPLE section, the end users can search employees using their Active directory features. To enable PEOPLE search, the SharePoint portal should be provisioned with User Profile Synchronization. After the enablement of Sync service, the Active Directory information will be fetched to the SharePoint and will be crawled, searchable with user inputs.
With SharePoint 2013 the Search results page has been modified and enhanced with,
1) Doc Preview
2) Result Categorization
3) Author wise categorization
4) Modified date categorization
Set Up A Search Center
First Search Service Application Should be provisioned via
Central Administration. There we have to specify search service account,

And app pool for
Search Service application and another app pool for Search Processing.

After that we have to create a Search Center Site Collection
to link with SharePoint portal,

Finally, we have to link newly created Search Center Site
with the content portal to facilitate end users to connect and find data,

Search Center Administration
After we have configured SharePoint
Search Centre via Central Administration, Administrators can verify the “Search
Administration” and the status.

1) Admin (Service Application)
2) Crawler
3) Content Processing
4) Analytics Processing
5) Query Processing
6) Index Partition, modules.
All elements should be in GREEN status to crawl the items in the SharePoint repository and processing with search center. With the configuration SharePoint creates 4 databases for Administration, analytics reporting, Crawling and linking information. We can allocate a dedicated server for SharePoint Search within the FARM to reduce the load to other application servers.
First we have to set data sources that needs to bind with SharePoint Search. With new features we can assign different data sources to crawl with SharePoint and display results within portal. (SharePoint Sites, My-Sites, Internet Sites)

Also we can set crawling intervals
for INCREMENTAL and FULL crawling. This will use a lot of resources, hence the
interval should be decided after analysis of exact data availability. If
frequently updating site, then crawling can be 2 hours.

Administrators can start any CRAWL
at any time via “Search Administration” page. The crawling will take few
minutes to few hours depends on the content and number of sites set in the
CONTENT SOURCES section. After a crawl, we can view the crawl log and
statistical information. It give last 24 hours, last 7 days and last month
statistics with number of ITEMS dealt with the crawl. Number of scanned items,
deleted items between last 2 crawls can be viewed using stats report. Administrators
can view item-wise status and time intervals.

Search Rules
After configured Search Center,
admins can create RULES to exclude items. It can be se via Crawl Rules.
Normal Search Result
When we search “SharePoint” word
within portal, we will see results including my uploaded document “What is
SharePoint”.

When we apply Crawl Rule, to
EXLUDE items from a document library as follows,

Do the crawling, we can see search
results with EXCLUDED items.

We can EXCLUDE search items using,
1) URLs
2) Key Terms
3) Specific words while using elevated privileges.
Crawl Reports
With the enhanced Search analytics, SharePoint can produce reports with different schema. The
1) Crawl Rate
2) Crawl Latency
3) CPU and Memory Load
4) Crawl Queue can be viewed with date filters.

It is little about SharePoint Search and its features.
Monday, September 21, 2015
How to track User Profile Sync Issues in SharePoint 2013
User Profile Synchronization is a default feature that we gets with SharePoint 2013. When we need to migrate User accounts, properties to SharePoint we are using User Profile Synchronization. But due to various reasons we are failing to do so.


To Track those issues we are getting a cool utility with SharePoint 2013.
It is miisclient located in /15/Synchronization Service/UIShell

After Open this utility we can see all synchronization attempts and the results.
It is called "Synchronization Service Manager on SERVERNAME".
There we can identify all attempts, time, status and Errors.

Here it says, "Replication Access was Denied" when trying to sync.
Thursday, May 21, 2015
Can't Edit Office 365 SharePoint Site Using SharePoint Designer
When we want to EDIT Office 365 SharePoint Site Using SharePoint Designer, we are getting unexpected error.


This is a problem with SharePoint Designer. We have to install Service Pack 1 for SharePoint Designer. (KB 2817441)


When we click OK it will "The Server couldn't complete the request".

This error happens when we OPEN root site, we can OPEN sub sites using SharePoint Designer.

After Restart the server, we can OPEN the Office 365 SharePoint Site Using Designer.
Subscribe to:
Posts (Atom)